SCANNING EXAMPLES &
TOUCH-UPS
By Charles
Bliley
Introduction
The following are examples of techniques I have used in editing scans of photographs for my family history/genealogy work. They do not eliminate the need for an ample amount of time and practice, nor have I address removing blemishes from your images. That is a topic for another day.
If you have any questions or comments, feel free to contact me by e-mail: K3NAU@AOL.com.
Chuck
Contents
- Photo Restoration Examples
- Photoshop Resources on the Internet
- My Other Genealogy-Related Presentations
Photo Restoration Examples
Here are several examples of how an old photos can be touched-up and turn a poor quality photo into something special with a little bit of work.
Example 1 -- Photo Cards
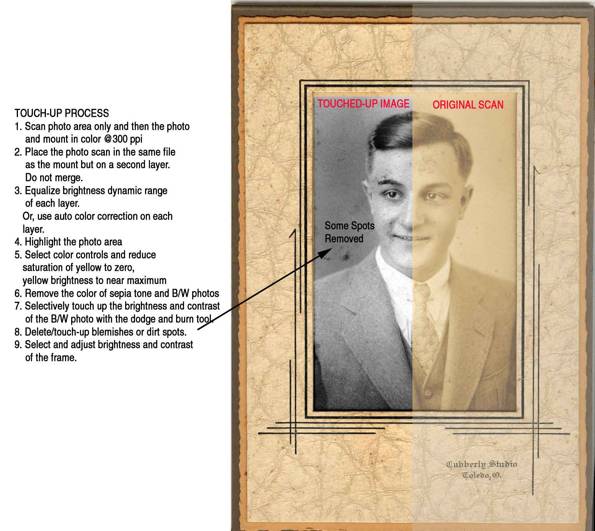
Many of us have old photo cards with nice borders and sepia tone photographs mounted on them. The paper has aged and the color if the print sometimes seems to mask the details in the photo. I prefer to remove the brown colonization whenever I scan one of these cards. The scanning process is done in two steps: one to capture the image and the second to capture the decorative border. Then, I scan the back side as it often has some notes on it. They can be very valuable in identifying the photo's content and providing leads to other information.
Touch-Up Process
- Scan photo area only and then the photo and mount in color (Typically @600 ppi)
- Place the photo scan in the same file as the mount, but on a second layer.Do not merge layers.
- Equalize brightness dynamic (grayscale) range of each layer Or, use auto color correction on each layer.
- Highlight the photo area
- Select color controls and reduce saturation of yellow to zero, yellow brightness to near maximum
- Remove the color of sepia tone and B/W photos
- Selectively touch up the brightness and contrast of the B/W photo with the dodge and burn tool.
- Delete/touch-up blemishes or dirt spots.
- Select and adjust brightness and contrast of the frame.
- Repeat the process after selecting only the paper border to remove the yellow colorcast.
Large-scale Version of Sample (140k JPEG)
|| Top of Page ||
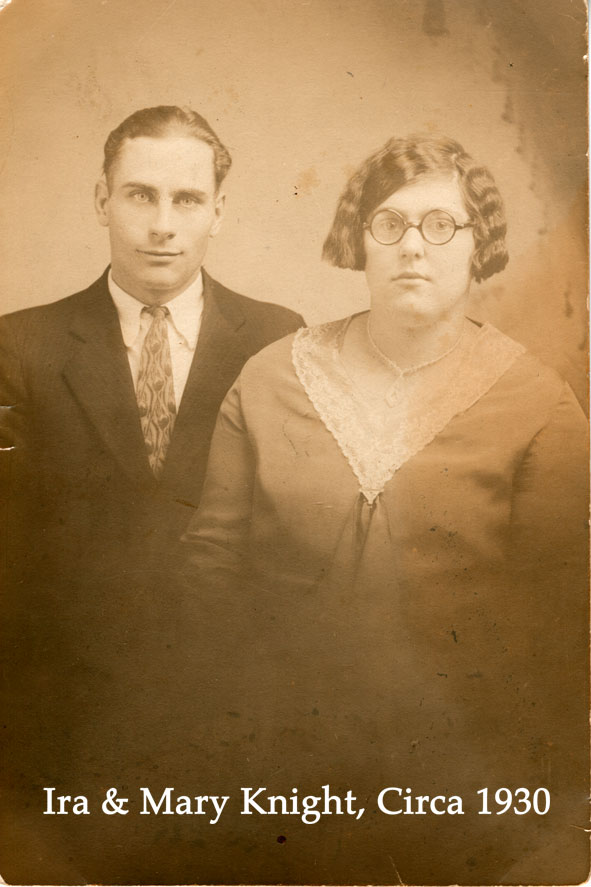
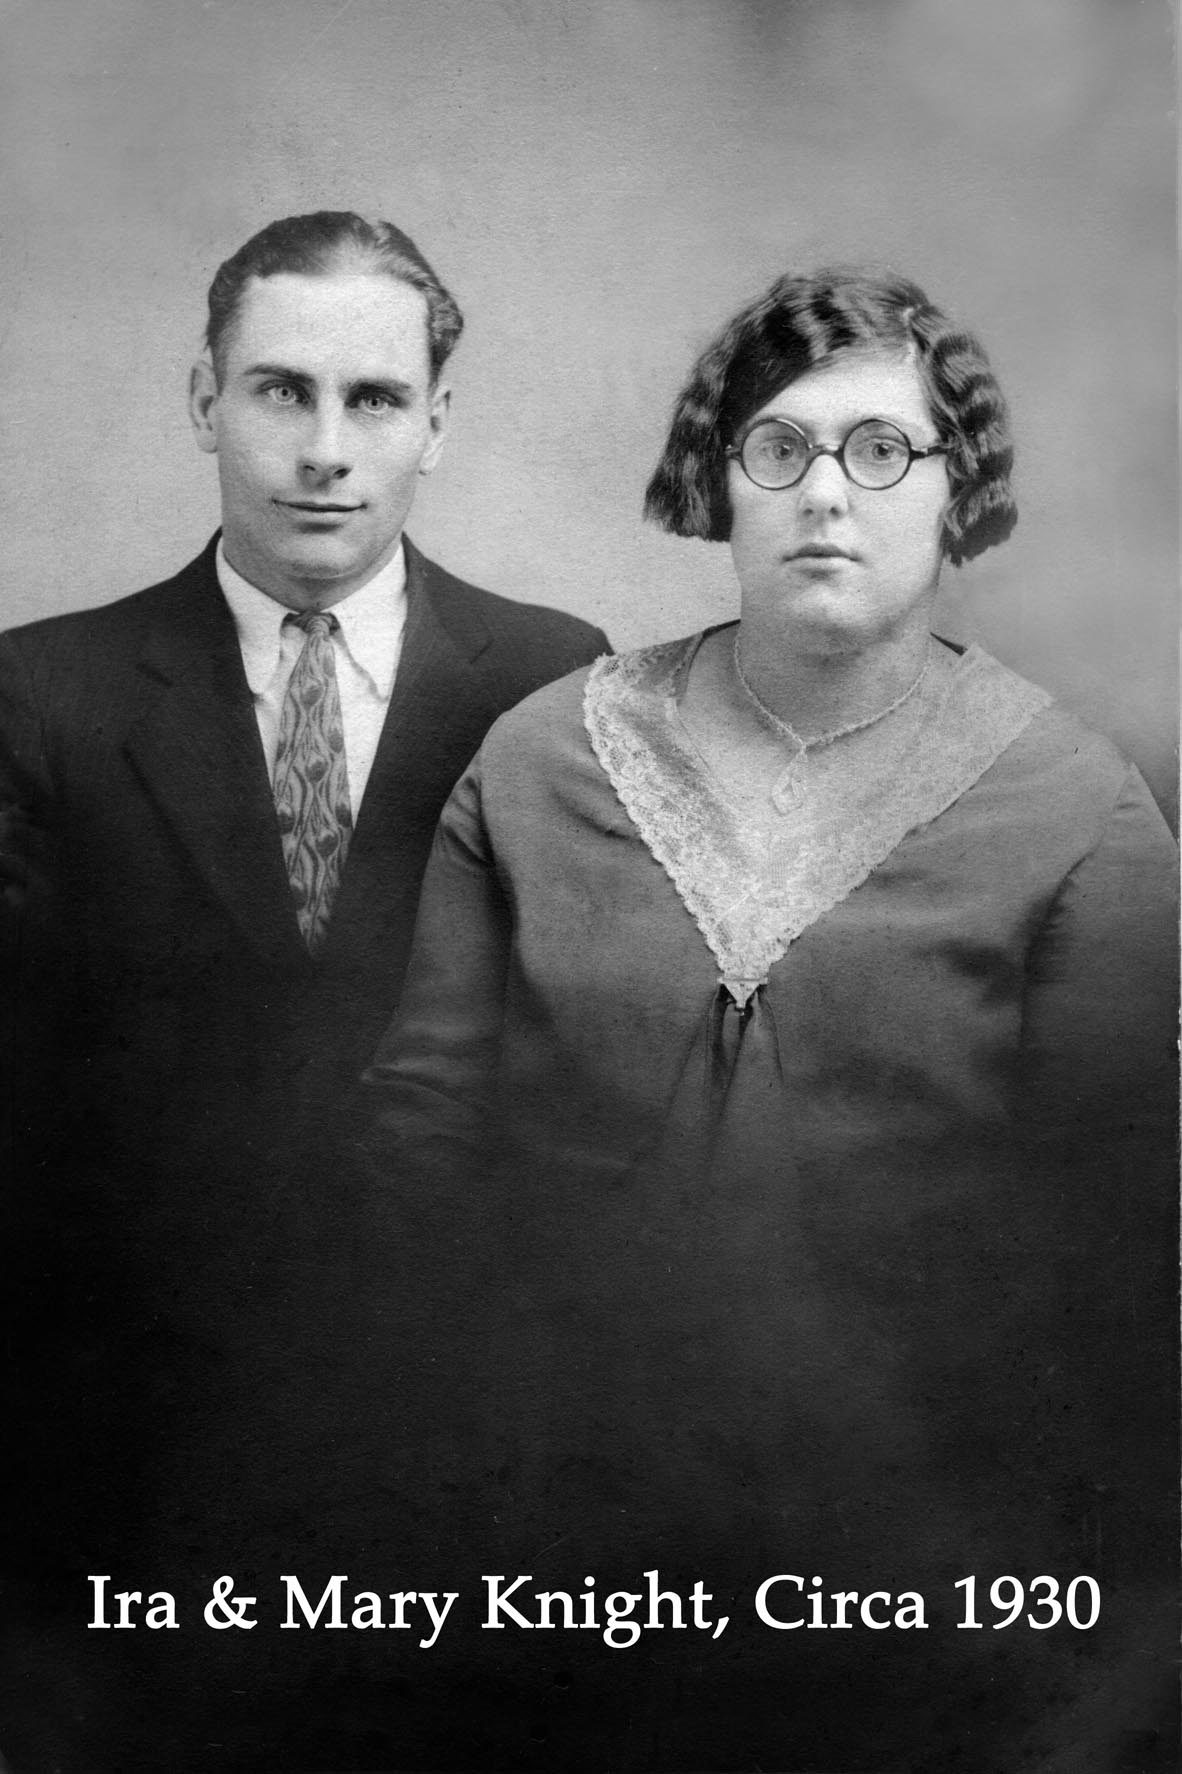
Example 2 -- 4" x 6" Sepia Tone Portrait
I think sepia tone photos are great as art, but lousy as archival photos. I always remove the sepia tone color as it makes the detail easier to see and allows a clear and economical copy to be printed on a B/W and inkjet printers alike.
- As in the previous example, scan the photo at a fairly high resolution, such as 600 ppi.
- Open in a photo editor program such as Photoshop and save the original scan on one layer and name it "Master" OR "Original".
- Duplicate the master layer and then hide it from view leaving only the duplicate for adjustment and editing as outlined above in the "Photo Card" section.
- Make improvements in overall contrast, sharpness, touch-up of scratches, and selective contrast improvements.
Here is the before and after versions of the same photo. Note the improvements in the lace and necklace.
Before and After Example
(Click on photo for enlargement.)|| Top of Page ||
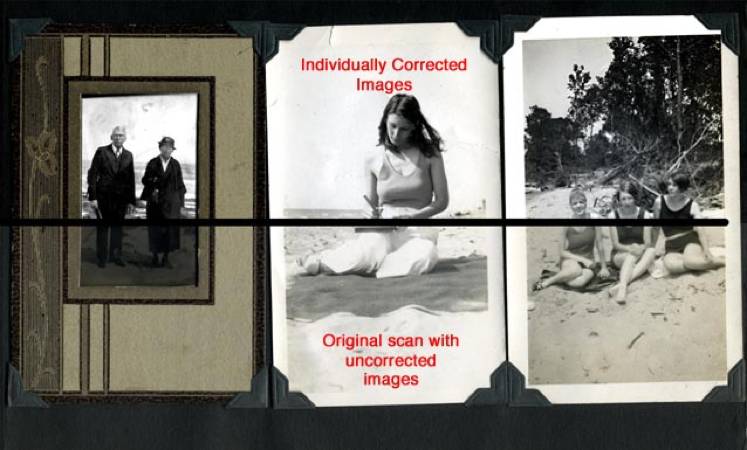
Example 3 -- Photo Album Pages
Photos mounted on paper with corner holders are wonderful to look at but difficult to scan. As in the example below, there may be several different types and qualities as seen below. The classic black background paper frequently embellished with white pencil captions is easy for the human eye to scan and pick out the details. The scanner is not as agile as the eye and to make a reasonable replica of the page requires one or more scans, followed by editing of each photo. This may be time consuming, but the results can be dramatic as seen below.
- Unedited Scan of Album Page (540k JPEG)
- Post-Processing of Album Page (600k JPEG)
Touch-Up Process
Scan the who page and place it on one layer in your photo editing program.
Without moving the photos on the scanner, scan each of the photos individually and place each image on a separate layer.
Duplicate each of the original scans, label them as masters and then hide them from editing.
Adjust the background to look reasonably good and if it contains white captions, adjust the contrast until the lettering is easy to read.
Select each photo, one at a time, using the polygon selection tool and remove anything that is part of the background, corner mounts or page.
Edit each photo independently.
- When you are done, save the file with all of its layers; do not flatten it. You can export the composite image as a flattened image if you like, but save the working file for possible use in the future.
|| Top of Page ||
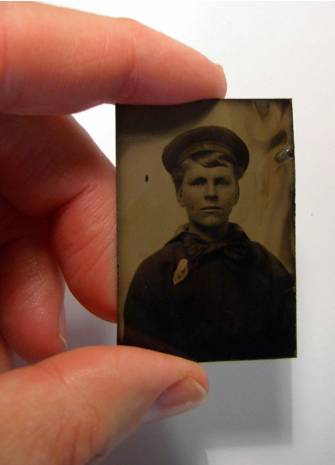
Example 4 -- Tin Type Photos
Even though some of these photos may be small, they have two important characteristics:
- High Resolution -- These images have the quality of a modern black and white film negative and can approach 2400 ppi.
- Mirrored Image -- The photo is imaged like a sheet of film in a camera with the exception the material is not transparent. As a result, the image you see is mirrored version of the image you see.
Small Tintype Photo
In this example, a photo of my great uncle, a sailor on the U.S.S. Michigan, it is small and poorly exposed, however it can be blown up to an 8-1/2 x 10 inch portrait and not look grainy. The image is also in the reverse as can be seen by the lettering on the band of his cap when viewed close-up.
Until I knew of this mirroring, I thought the letters were in the Cyrillic alphabet (Russian). That did not make sense based on his personal history nor likely to be on the cap of a U.S. military uniform.Scanned Image
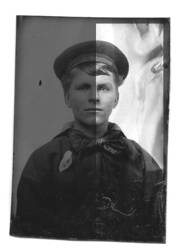
Uncorrected (L) - Corrected (R)
Scanned in color and adjusted/edited, then color removed.
Click Here to View A Selection of the Edited Photo (216k JPEG)
Note the details revealed in this small photograph.|| Top of Page ||
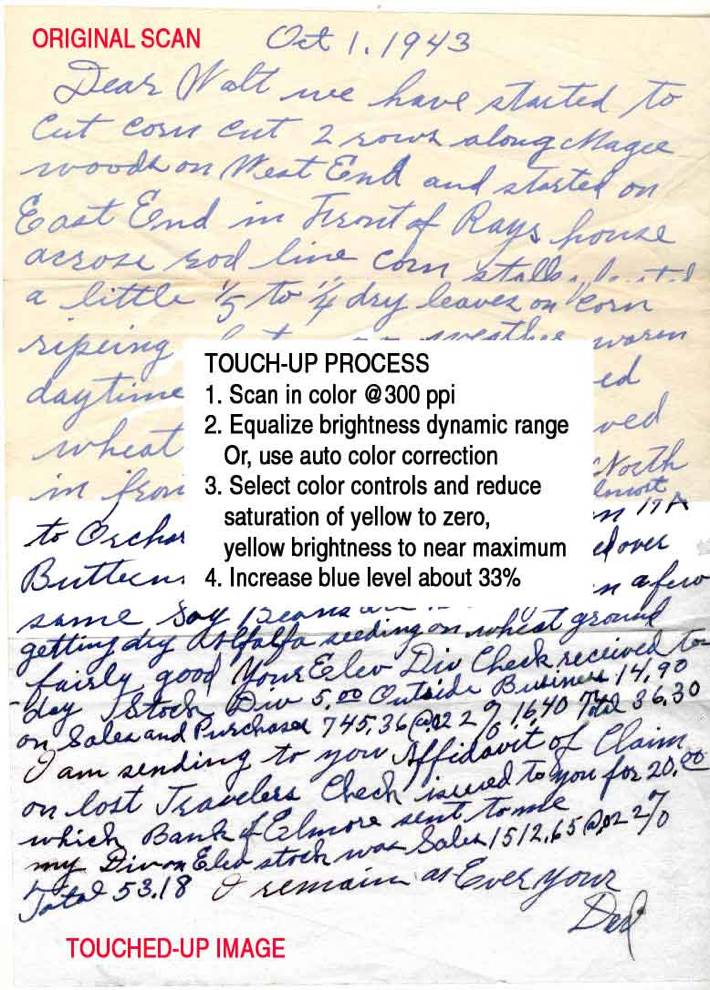
Example 5 -- Old Hand-Written Letters
Old letters can be real treasures but hard to read as the paper yellows and the ink fades. Scan you letters in color and make adjustments to the color saturation of the ink and remove the yellow to restore it to what it looked like when it was first penned. Sometimes the ink was black and that makes it more difficult to darken it, but you can make it easier to read.
|| Top of Page ||
Example 6 -- Scanning Books and Magazines
Introduction
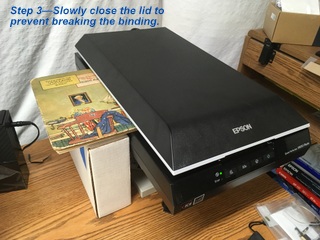
One of the big challenges is trying to scan printed materials that are composed of pages bound together. Sure, you can remove the binding and separate the pages, but that is not usually practical or desirable. Scanning printed material is usually much better than photographs, but it can be just as good or better if the book is not too tightly bound or thick.
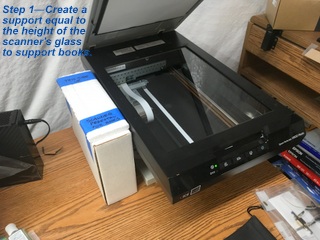
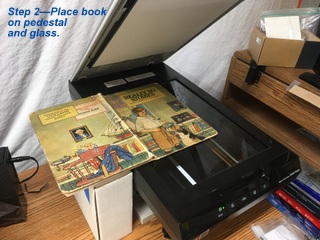
Set-up on My Desktop Scanner
My Epson V600 does a great job or scanning single sheets of paper or photographs, but I needed to do the occasional book. I have my scanner on a pedestal to maximize the desktop space. It is about four inches above the desk. In order to support the book or magazine during scanning, I found a combination of a box with a scrap of foam just equal to the height of the scanner glass surface. I added some old candy in the box used as a weight for stability; you may use whatever you like as a weight. I place it next to the scanner to support the publication and prevent too much stress put on the binding.
Step 1—Click Here for Enlargement
Step 2—Click Here for Enlargement
Step 3—Click Here for Enlargement
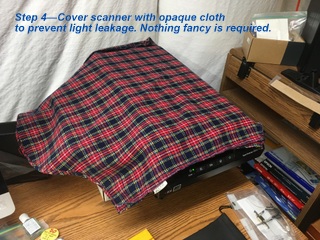
Step 4—Click Here for Enlargement
PDF of all four photos. (12 Mb)
|| Top of Page ||
Example 7 -- Scanning Glass Plate Negatives
Introduction
Several years ago, I was shown several boxes of glass plate negatives from 1907. I looked at them by holding them up to a light. Boy, was I excited to see how my great cousin made some of the photocopies he used in his family photo albums. It was looking back in time to see the magician's tools. But, how was I going to scan these ancient image sources? None of the frames for negatives were for glass plates? Why would the manufacturer expect anyone to need to scan these century old relics?
Most of the references on the Web told of professional services that would take you glass negatives and do an exceptional job for you at a relatively high cost. One source even spoke of image distortion from scanner lights designed for scanning film negatives using special glass. I wanted to try to see if there was a simpler and cost-effective tool that I could use at home.
Setting-up My Desktop Scanner
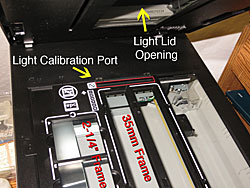
My Epson V600 scanner, like many others on the market, came with a "light lid" and frames designed to scan sheets of film and slides. I looked carefully at the arrangement to see if it could be adapted for glass plates. Basically, they provide a nice frame designed for various types of film that rests on the surface of the scanner and aligns well with the light source in the lid. To scan a transparency, you remove the shield obscuring the light from the cover's light source.
While scanning slides, I noticed a small aperture on the leading edge of each of the scanning frames. I concluded this was to provide the pick-up/scanning optics with a way to measure and calibrate the level and quality of the light source in the lid before performing the scan of the film. I concluded this was essential to a good scan. I then placed a glass negative on the scanner surface and tried a scan with a small gap between the plate and the top edge of the scanning area. It worked!
This arrangement worked well, but the plate was difficult to keep square on the scanner glass. I found a sheet of white heavy card stock placed on the scanner glass and registered to the right edge served as an edge to align the glass plate and a panel to obscure the light in the areas where there were no negative plates. I then put the glass negative up against it and slid the two down from the scanner leading edge to create a reasonable calibration port. Then, taped the cardboard to the edge of the scanner.
Now, I can place the glass plate negatives on the scanner, with the emulsion side up, close the lid and set the scanner interface to black and white transparency film. Look at the preview and select the area to be scanned.
Standard Film & Slide Scanning Setup
Click Here for Enlargement
Improvised Glass Plate Scanning
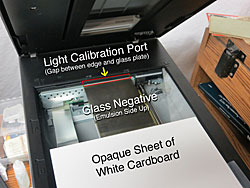
Click Here for Enlargement
|| Top of Page ||
ADOBE PHOTOSHOP ELEMENTS RESOURCES
TRAINING RESOURCES ON THE INTERNET (Note: High-Speed Connection May Be Required)
Photoshop Elements Built-In Tutorials (Adobe Corp.)
Do not overlook the great tutorials that come with Photoshop Elements. Get access through the Help menu. What could be easier and its is FREE!
Photoshop Elements 7.0 Training from VTC
http://www.vtc.com/products/Adobe-Photoshop-Elements-7-Tutorials.htm
This is a great promotional page with about 40 free samples that would make us look like rank amateurs. The QuickTime images are a bit coarse, but who can complain when it is free. I have bought one of their training disks for GoLive and the images are high-resolution.
Two version of each sample are provided: one for high-speed connections and one for low-speed (dial-up) connections. The difference is only in the image quality of screen captures.
Other traing is available for later Photoshop Element versions.
Web Style Guide--Graphics Section
http://www.webstyleguide.com/index.html
While not a tutorial on Photoshop, this site dies have good examples of the impact of file format choices (JPEG/GIF/PNG) when you are done editing for images destined for the Web or off-line viewing.
APPLICATION RESOURCES
Photoshop Plug-ins
https://www.lifewire.com/photoshop-4781551
There are a ton of resources to enhance the capabilities of Photoshop. They are very easy to install and many of them are free! Most enhance the Filters and Layers pallets. Note: Some will only work with the professional version of Photoshop or Photoshop LE or later.
Be careful, playing with these tools can be a time trap. They can provide some fantastic effects or services, but do not forget to explore and learn the basics of the Photoshop program.
TECHNCIAL SUPPORT
Adobe Customer Forums (All products)
Gateway to dozens of user forums on Adobe products, including Photoshop Elements and its other versions. Free, but registration required. Forums/users-groups can be a highly valuable resource.
MY OTHER GENEALOGY-RELATED PRESENTATIONS
Online versions of presentations given to the Rochester Genealogy Society about several of my projects.
|| Top of Page ||
Copyright 2012, Charles A. Bliley, Webster, NY— Bliley.net